Saturday, December 11, 2010

Ruby Challenge 2010: Creating first application and working with Git

Hi all one more time,

Last time we stopped by installing Rails. Let’s check one more time it’s current version

C:\Users\Monomachus>rails --version
Rails 3.0.3

You can notice that from the last time we talked about it Rails version changed from 3.0.1 to 3.0.3. That’s because I’ve updated my system.

Now lets create a new application with Rails. We can do it by using “rails new name_of_the_application” command

D:\rails_tutorial_project>rails new first_application
      create
      create  README
      create  Rakefile
      create  config.ru
      create  .gitignore
      create  Gemfile
      create  app
      create  app/controllers/application_controller.rb
      create  app/helpers/application_helper.rb
      create  app/mailers
      create  app/models
      create  app/views/layouts/application.html.erb
      create  config
      create  config/routes.rb
      create  config/application.rb
      create  config/environment.rb
      create  config/environments
      create  config/environments/development.rb
      create  config/environments/production.rb
      create  config/environments/test.rb
      create  config/initializers
      create  config/initializers/backtrace_silencers.rb
      create  config/initializers/inflections.rb
      create  config/initializers/mime_types.rb
      create  config/initializers/secret_token.rb
      create  config/initializers/session_store.rb
      create  config/locales
      create  config/locales/en.yml
      create  config/boot.rb
      create  config/database.yml
      create  db
      create  db/seeds.rb
      create  doc
      create  doc/README_FOR_APP
      create  lib
      create  lib/tasks
      create  lib/tasks/.gitkeep
      create  log
      create  log/server.log
      create  log/production.log
      create  log/development.log
      create  log/test.log
      create  public
      create  public/404.html
      create  public/422.html
      create  public/500.html
      create  public/favicon.ico
      create  public/index.html
      create  public/robots.txt
      create  public/images
      create  public/images/rails.png
      create  public/stylesheets
      create  public/stylesheets/.gitkeep
      create  public/javascripts
      create  public/javascripts/application.js
      create  public/javascripts/controls.js
      create  public/javascripts/dragdrop.js
      create  public/javascripts/effects.js
      create  public/javascripts/prototype.js
      create  public/javascripts/rails.js
      create  script
      create  script/rails
      create  test
      create  test/fixtures
      create  test/functional
      create  test/integration
      create  test/performance/browsing_test.rb
      create  test/test_helper.rb
      create  test/unit
      create  tmp
      create  tmp/sessions
      create  tmp/sockets
      create  tmp/cache
      create  tmp/pids
      create  vendor/plugins
      create  vendor/plugins/.gitkeep

Will get to each of those files in this series posts, this is what I hope at least to achieve.

Tip of the day: .gitignore file is used to let git know what kind of files we don’t want to add/commit to repository 

Ok, so we got everything created now and rails made for us a brand new application which should already work so let’s try it with “rails server” command. First we need to cd into the new created directory.

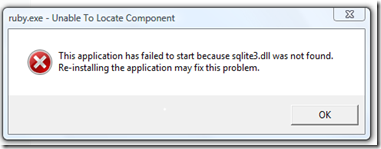
And I got error at first

railsStartError

And these errors in command line

D:\rails_tutorial_project\first_application>rails server
C:/rubies/Ruby192/lib/ruby/gems/1.9.1/gems/sqlite3-ruby-1.3.2-x86-mingw32/lib/sq
lite3.rb:6:in `require': no such file to load -- sqlite3/sqlite3_native (LoadErr
or)
        from C:/rubies/Ruby192/lib/ruby/gems/1.9.1/gems/sqlite3-ruby-1.3.2-x86-m
ingw32/lib/sqlite3.rb:6:in `rescue in <top (required)>'
        from C:/rubies/Ruby192/lib/ruby/gems/1.9.1/gems/sqlite3-ruby-1.3.2-x86-m
ingw32/lib/sqlite3.rb:2:in `<top (required)>'
        from C:/rubies/Ruby192/lib/ruby/gems/1.9.1/gems/bundler-1.0.7/lib/bundle
r/runtime.rb:64:in `require'
        from C:/rubies/Ruby192/lib/ruby/gems/1.9.1/gems/bundler-1.0.7/lib/bundle
r/runtime.rb:64:in `block (2 levels) in require'
        from C:/rubies/Ruby192/lib/ruby/gems/1.9.1/gems/bundler-1.0.7/lib/bundle
r/runtime.rb:62:in `each'
        from C:/rubies/Ruby192/lib/ruby/gems/1.9.1/gems/bundler-1.0.7/lib/bundle
r/runtime.rb:62:in `block in require'
        from C:/rubies/Ruby192/lib/ruby/gems/1.9.1/gems/bundler-1.0.7/lib/bundle
r/runtime.rb:51:in `each'
        from C:/rubies/Ruby192/lib/ruby/gems/1.9.1/gems/bundler-1.0.7/lib/bundle
r/runtime.rb:51:in `require'
        from C:/rubies/Ruby192/lib/ruby/gems/1.9.1/gems/bundler-1.0.7/lib/bundle
r.rb:112:in `require'
        from D:/rails_tutorial_project/first_application/config/application.rb:7
:in `<top (required)>'
        from C:/rubies/Ruby192/lib/ruby/gems/1.9.1/gems/railties-3.0.3/lib/rails
/commands.rb:28:in `require'
        from C:/rubies/Ruby192/lib/ruby/gems/1.9.1/gems/railties-3.0.3/lib/rails
/commands.rb:28:in `block in <top (required)>'
        from C:/rubies/Ruby192/lib/ruby/gems/1.9.1/gems/railties-3.0.3/lib/rails
/commands.rb:27:in `tap'
        from C:/rubies/Ruby192/lib/ruby/gems/1.9.1/gems/railties-3.0.3/lib/rails
/commands.rb:27:in `<top (required)>'
        from script/rails:6:in `require'
        from script/rails:6:in `<main>'

After poking a little bit on forums I saw that I need to download the latest version of Sqlite dll’s and put them into my “ruby\bin” folder. Ok no problems, let’s do it. So you can download it here.

sqliteDownloads

Downloaded, unziped, xcopied into ruby\bin folder. Let’s try again.

D:\rails_tutorial_project\first_application>rails server
=> Booting WEBrick
=> Rails 3.0.3 application starting in development on http://0.0.0.0:3000
=> Call with -d to detach
=> Ctrl-C to shutdown server
[2010-12-11 10:00:40] INFO  WEBrick 1.3.1
[2010-12-11 10:00:40] INFO  ruby 1.9.2 (2010-08-18) [i386-mingw32]
[2010-12-11 10:00:44] INFO  WEBrick::HTTPServer#start: pid=3560 port=3000

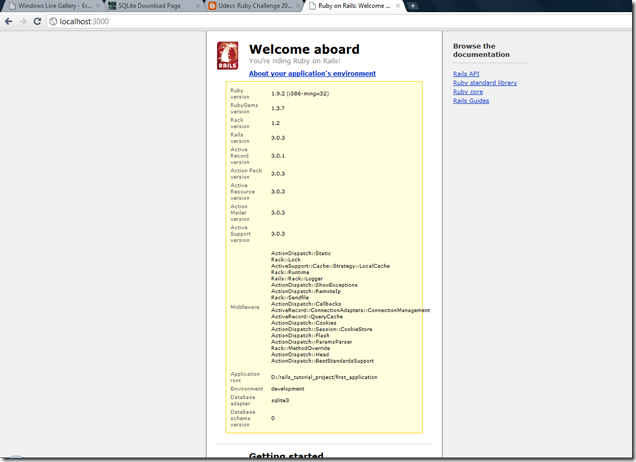
Ok so now that works fine.

runningServer

P.S. Anyone knows how to run the server and then to detach in windows it also gives me an error in Windows when I try to use “rails server –d”

D:\rails_tutorial_project\first_application>rails server -d
=> Booting WEBrick
=> Rails 3.0.3 application starting in development on http://0.0.0.0:3000
C:/rubies/Ruby192/lib/ruby/gems/1.9.1/gems/activesupport-3.0.3/lib/active_suppor
t/core_ext/process/daemon.rb:3:in `fork': fork() function is unimplemented on th
is machine (NotImplementedError)
        from C:/rubies/Ruby192/lib/ruby/gems/1.9.1/gems/activesupport-3.0.3/lib/
active_support/core_ext/process/daemon.rb:3:in `daemon'
        from C:/rubies/Ruby192/lib/ruby/gems/1.9.1/gems/rack-1.2.1/lib/rack/serv
er.rb:262:in `daemonize_app'
        from C:/rubies/Ruby192/lib/ruby/gems/1.9.1/gems/rack-1.2.1/lib/rack/serv
er.rb:202:in `start'
        from C:/rubies/Ruby192/lib/ruby/gems/1.9.1/gems/railties-3.0.3/lib/rails
/commands/server.rb:65:in `start'
        from C:/rubies/Ruby192/lib/ruby/gems/1.9.1/gems/railties-3.0.3/lib/rails
/commands.rb:30:in `block in <top (required)>'
        from C:/rubies/Ruby192/lib/ruby/gems/1.9.1/gems/railties-3.0.3/lib/rails
/commands.rb:27:in `tap'
        from C:/rubies/Ruby192/lib/ruby/gems/1.9.1/gems/railties-3.0.3/lib/rails
/commands.rb:27:in `<top (required)>'
        from script/rails:6:in `require'
        from script/rails:6:in `<main>'
WORKING WITH GIT

Ok now let’s try to work a little bit with git. I’ll be using now the “Git Bash” command line.

$ git init                // initilize the repository
$ git add .               // adds everything to repository
$ git commit -m "First commit" // make initial commit

So here everything should be clear. In git commit command –m means specifying message.

Now we can check the logs

Monomachus@MONOMACHUS-PC /d/rails_tutorial_project/first_application (master)
$ git log
commit 24d181eef79f1c6bd28898bcb0a587ff04a73dca
Author: unknown <Monomachus@.(none)>
Date:   Sat Dec 11 10:12:55 2010 +0200

    First commit

Now let’s see how can we checkout but first let’s delete some important file (Gemfile for example) and verify the status of git.
Monomachus@MONOMACHUS-PC /d/rails_tutorial_project/first_application (master)
$ rm Gemfile*

Monomachus@MONOMACHUS-PC /d/rails_tutorial_project/first_application (master)
$ ls
README    app     config.ru  doc  log     script  tmp
Rakefile  config  db         lib  public  test    vendor

Monomachus@MONOMACHUS-PC /d/rails_tutorial_project/first_application (master)
$ git status
# On branch master
# Changed but not updated:
#   (use "git add/rm <file>..." to update what will be committed)
#   (use "git checkout -- <file>..." to discard changes in working directory)
#
#       deleted:    Gemfile
#       deleted:    Gemfile.lock
#
no changes added to commit (use "git add" and/or "git commit -a")

Monomachus@MONOMACHUS-PC /d/rails_tutorial_project/first_application (master)
$ git checkout -f

Monomachus@MONOMACHUS-PC /d/rails_tutorial_project/first_application (master)
$ ls
Gemfile       README    app     config.ru  doc  log     script  tmp
Gemfile.lock  Rakefile  config  db         lib  public  test    vendor


So you can see here that using “git status” command we checked out the status of repository and with “git checkout –f” command we made a forced checkout and restored everything as it was before.

It’s all for today. Next time we’ll play a little with Github and Heroku. I hope you liked it.
 

Monday, November 15, 2010

Climate Change – Think about it for a second

At least change electricity bulbs in your house. Everyone should be involved. Thumbs up the video.


Also you can check a lot of internet flash games related to eco-system. For example these games.

There is also a game which will be out in 2011 which whole subject is Ecology and disastrous state: Fate of the World.

P.S. You can comment out what exactly do you think we could do, to save the planet, but something doable which depends on us, not those big corporations.

Tuesday, November 2, 2010

Ruby Challenge 2010: Installing Ruby and its tools on Windows

Hi,

Today I decided to install all the prerequisites and to show you how I’ve done this, may be for some people it will be useful. And I’m doing it by reproducing the Rails 3.0 tutorial but for Windows.

1. Text editor / IDE

From various IDEs and Unix-style editors like vi or emacs or whatever. I decided to go with a full IDE solution so … the nominees are

  1. Aptana Studio 2.0 – standalone version
  2. NetBeans 6.9.1 – ruby version
  3. RubyMine 2.0 – from JetBrains (creators of Resharper, TeamCity and a lot of other cool software for programmers).

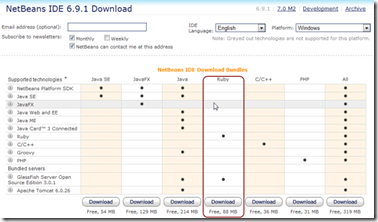
I wanted to go with RubyMine because I already know the difference Resharper brings in my development process, but it’s a 30-days trial, and I don’t want to switch to something new in next few months, so no. I don’t have previous experience with Aptana Studio, and may be I will try it some day, but I had a pleasant experience with NetBeans so for now I will go with that.

NetBeansDownload

2. Git

Ruby community uses intensely a version control system called Git, so I will install it too. For windows part it is very simple. You go to http://code.google.com/p/msysgit/. Click “Downloads” and choose current version Git.exe installer.

DownloadingGitForWindows

Install process is Windows-style - very simple as well. We don’t have to manually compile something or edit, everything goes quite simple.

InstallingGit

3. Installing Ruby

First we need to be sure that our system doesn’t already has Ruby installed. Let’s try it.

C:\Users\user_name>ruby -v
'ruby' is not recognized as an internal or external command,
operable program or batch file.

Well looks like I don’t have it installed. Not a problem. First we’ll install Ruby 1.8.7 which works well with Rails 2.3. We’ll go to Download Ruby page search for “Ruby on Windows” section and select Ruby 1.8.7-p302 RubyInstaller. Installation goes smoothly. I associated my *.rb files with ruby and added Ruby executables to my path.

Now we see this in our command line:

C:\Users\user_name>ruby -v
ruby 1.8.7 (2010-08-16 patchlevel 302) [i386-mingw32]
4. Installing and using Pik

pikScreenshot

What is Pik? Pik is a Windows alternative to Ruby Version Manager (RVM) which allows us to have multiple Ruby versions installed at the same time, as I said before we need Ruby 1.8.7 to work with Rails 2.3 and Ruby 1.9.2 to work with Rails 3.0.1 and Pik will help us in dealing with this. You can download Pik from github. Also be sure to check its Wiki page “Usage”.

Now when we run the first time pik it adds the default Ruby path which right now points to version 1.8.7. I also set Pik default install directory to “C:\Rubies” and I also show how to add an existing ruby installation to pik with the “add” command.

C:\Users\user_name>pik
** Adding:  187: ruby 1.8.7 (2010-08-16 patchlevel 302) [i386-mingw32]
 Located at:  C:\Rubies\Ruby187\bin
Usage: pik command [options]

To get help with a command

  pik help (command)

To list all commands and descriptions:

  pik help commands

    -V, --version                    Pik version
    -d, --debug                      Outputs debug information

C:\Users\user_name>pik config installs="C:\Rubies"

C:\Users\user_name>pik add C:\Rubies\Ruby-1.9.2dev-p3-i386-mingw32\bin
** Adding:  192: ruby 1.9.2dev (2010-05-31) [i386-mingw32]
 Located at:  C:\Rubies\Ruby-1.9.2dev-p3-i386-mingw32\bin

Next I show how to install a Ruby version using “install” command. In my particular case I installed IronRuby specifying the version, and then not specifying it. When you don’t specify it then Pik downloads the latest version. (although at the moment the latest version of IronRuby is 1.1.1, don’t know what is wrong there). Than I show how to list all the available Rubies installations (note that * marks the default ruby used at the moment), how to remove a Ruby install from Pik management, and how to switch to another Ruby installation.

C:\Users\user_name>pik install IronRuby 1.0.0
** Downloading:  http://rubyforge.org/frs/download.php/69853/ironruby-1.0.0rc.zi
p
   to:  C:\Users\user_name\.pik\downloads\ironruby-1.0.0rc.zip

ironruby-1.0.0rc.zip: 100% |ooooooooooooooooooo|   4.7MB/  4.7MB Time: 00:00:06

** Extracting:  C:\Users\user_name\.pik\downloads\ironruby-1.0.0rc.zip
   to:  C:\rubies\IronRuby-100rc
done

Couldn't find a Ruby version at C:\rubies\IronRuby-100rc\bin

C:\Users\user_name>pik add C:\Rubies\IronRuby-100rc\ironruby\bin
** Adding:  100: IronRuby 1.0.0.0 on .NET 2.0.50727.4454
 Located at:  C:\Rubies\IronRuby-100rc\ironruby\bin

C:\Users\user_name>pik install IronRuby
** Downloading:  http://rubyforge.org/frs/download.php/70181/ironruby-1.0v4.zip

   to:  C:\Users\user_name\.pik\downloads\ironruby-1.0v4.zip

ironruby-1.0v4.zip: 100% |ooooooooooooooooooooo|   2.9MB/  2.9MB Time: 00:00:04

** Extracting:  C:\Users\user_name\.pik\downloads\ironruby-1.0v4.zip
   to:  C:\rubies\IronRuby-10v4
done

** Adding:  100: IronRuby 1.0.0.0 on .NET 4.0.30319.1
 Located at:  C:\rubies\IronRuby-10v4\bin

C:\Users\user_name>pik remove C:\Rubies\IronRuby-100rc\ironruby\bin

Quitting...

C:\Users\user_name>pik help commands

  add             Adds another ruby location to pik.
  benchmark|bench Runs bencmarks with all versions that pik is aware of.
  config          Adds/modifies configuration options.
  default         Switches back to the default settings.
  devkit          Configures devkit settings
  gem             Runs the gem command with all versions that pik is aware of.
  gemsync         Synchronizes gems from the version specified to the current ve
rsion.
  help            Displays help information.
  implode         Removes your pik configuration.
  info|checkup|cu Displays information about the current ruby version.
  install|in      Downloads and installs different ruby versions.
  list|ls         Lists ruby versions that pik is aware of.
  rake            Runs the rake command with all versions that pik is aware of.
  remove|rm       Removes a ruby location from pik.
  ruby|rb         Runs ruby with all versions that pik is aware of.
  run             Runs command with all versions of ruby that pik is aware of.
  tag             Adds the given tag to the current version.
  tags            Runs the pik command against the given tags.
  uninstall|unin  Deletes a ruby version from the filesystem and removes it from
 Pik.
  update|up       updates pik.
  use|switch|sw   Switches ruby versions based on patterns.

For help on a particular command, use 'pik help COMMAND'.

C:\Users\user_name>pik list
  100: IronRuby 1.0.0.0 on .NET 2.0.50727.4454
  100: IronRuby 1.0.0.0 on .NET 4.0.30319.1
* 187: ruby 1.8.7 (2010-08-16 patchlevel 302) [i386-mingw32]
  192: ruby 1.9.2dev (2010-05-31) [i386-mingw32]

C:\Users\user_name>pik remove 100
Select which Ruby you want:
1. 100: IronRuby 1.0.0.0 on .NET 2.0.50727.4454
2. 100: IronRuby 1.0.0.0 on .NET 4.0.30319.1
?  1
Are you sure you'd like to remove '100: IronRuby 1.0.0.0 on .NET 2.0.50727.4454'
?  |yes|

100: IronRuby 1.0.0.0 on .NET 2.0.50727.4454 removed.

C:\Users\user_name>pik use 192

C:\Users\user_name>pik list
  100: IronRuby 1.0.0.0 on .NET 4.0.30319.1
  187: ruby 1.8.7 (2010-08-16 patchlevel 302) [i386-mingw32]
* 192: ruby 1.9.2dev (2010-05-31) [i386-mingw32]

The only thing that I can’t find is an alternative to RVM –create command which is often convenient to create separate gemsets. 

5. Installing and using RubyGems

gems

UPDATE: After installing any version of Ruby you already should have RubyGems installed. You can check it up by using “gem –v” command. I talk about installing RubyGems here just because I was having errors with default installation of gem. 

After everything done I already have gems installed but it has some errors so I will download the latest version from here. After that you unpack it somewhere cd into its directory and say

ruby setup.rb

Now gems should be installed. Next thing you could do is see what is your Gems environment with “gem env” command, or see the gems sources with “gem sources” command. Finally you could do “gem list” for list of local gems, “gem list –r” for remote gems, and “gem list STRING” which will bring you the list of gems starting with string.

6. Installing Rails

rails

Now having Gems installed it’s really easy to install Rails. You should just say

gem install rails

Or

gem install rails --version 3.0.1

Now everything should be prepared and installed. You can verify it by writing “rails –v” and have the rails version.

Well that’s a lot of things to do, especially if you’re used already with Windows way of installing things. Hope this post will help someone.

Next time we’ll do our first application in RoR (Ruby on Rails), so stay tuned!

Tuesday, October 26, 2010

Started learning Ruby

Hi,

Today I decided to start learning Ruby on Rails 3.0.

Why? Well, there are a dozen of reasons but the most important are:

  • I’ve seen and listened enough about this language and all I’ve heard are positive things, well I assume there are also some negative things like debugging for example (debugging is an issue for a lot of dynamic type languages),
  • also I’d like to be able to make things a little bit more easy. I’d like to do it in a faster manner. I’d also like to have an alternative to .NET, because of its initial costs.
  • Well, also it is because of one of the podcasts I listen, This developer’s life. In podcast #5 Homerun Rob Conery talks with Rails creator David Heinemeier Hansson about Rails creation and about Rails in general, he seems very excited and is very confident about Rails future. Also one listening was watching the panel discussion of .NET Rocks! from NDC (Norwegian Developer Conference 2010). There were a lot of .NET folks and also Ruby folks as well, the panel topic was “ASP.NET MVC vs Ruby on Rails”, in the end silently everybody agreed that Ruby is simpler for startups, and it costs less (I mean you don’t need Visual Studio licenses and SQL Servers).
  • They all talk about this great Ruby community which is willing to help you if you will have any problems at all. I want to check that out.
  • I hope understanding more ASP.NET MVC 3 after making something practical in Ruby on Rails.
  • We do have now DLR  and IronRuby 1.0 in .NET so I could use my new set of skills in my usual environment.

Now where should I start from?

Assuming that I want to learn fast I found these two videos which apparently enough are very famous in Ruby world, and gave me a taste of what kind of power Ruby is:

Rails creator David Heinemeier Hansson shows how to make a blog in 15 minutes using Ruby on Rails


And the same kind of video but using already Rails 2.0 (it has 2 parts)

Creating blog in 15 minutes by Ryan Bates Part 1


Creating blog in 15 minutes by Ryan Bates Part 2

Now I must admit that I’ve seen it before using ASP.NET MVC but still I think it is very power. By the way the new ASP.NET MVC 3 is in beta now so you can check it out.

I also found a nice site on starting Ruby on Rails 3.0 using all modern tools which are used in the community like Git, GitHub and Heroku. And because it is not too long I’ll start to read these tutorial. Learn Rails by Example.

Also to be motivated I’ll need to do something real. Because I’m playing in a strategic web game fr.europe1400.com, and I’m the founder of the guild there I will try to create a web site for this guild.

What should this website include:

  1. Authentication
  2. User roles: admin, moderator, others
  3. User details
  4. Informative section: includes videos, pictures
  5. Discussion panel: which is pretty much the same as a forum or blog: someone creates a post and then someone else comment this post.
  6. Some admin only functionalities.

Well I hope it won’t take too long till this site will be up and running on Heroku. See ya, hope next time I’ll bring some code.

Wednesday, October 20, 2010

Tools I can’t imagine my dev life without #2: XSLT Debugger in Visual Studio

Hi,

While a lot of us .NET developers at some point in our life used XSLT, it was never easy. Of course our logic and XSLT syntax should help us to understand different things but that is not always the case. Probably because it’s almost always a black box abstraction.

In my last project we use a lot of XSLT for generating all kind of documents with all kind of restrictions and filtering, usually you have an XML document, you got an XSLT and a XslCompiledTransform object which you use to actually get your transformed document. But because of the thing that it is like a black box all you can do is sit back and hope you did well the XSLT thing and you’ll get needed document out of the box. At least this is what I thought until this week.

This week I needed to change one of my XSLT document templates, because I was getting a very strange error at document generation. I thought at this moment that I couldn’t do it without debugging and I was hoping that somewhere in the world existed a nice tool which could manage XSLT debugging and which would have at least a trial period. I googled “debug XSLT”, and guess what I found? This link which gave me the power I didn’t even imagined to have without having to install some third-party tools.

It is incorporated directly in Visual Studio !!! I tried it in VS 2008 and VS 2010, Visual Studio 2010 even got a profiler for XSLT, so you could measure your transformation sheets and make reports on that. Isn’t that great? Plus you got a lot of way to do debugging. And now some screenshots.

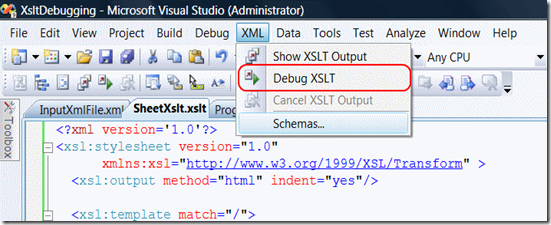
DebugXslt

1. While stylesheet open click on XML => Debug Xslt

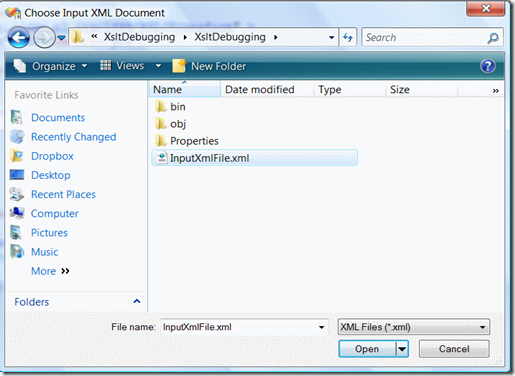
ChooseXml

2. Choose input XML file

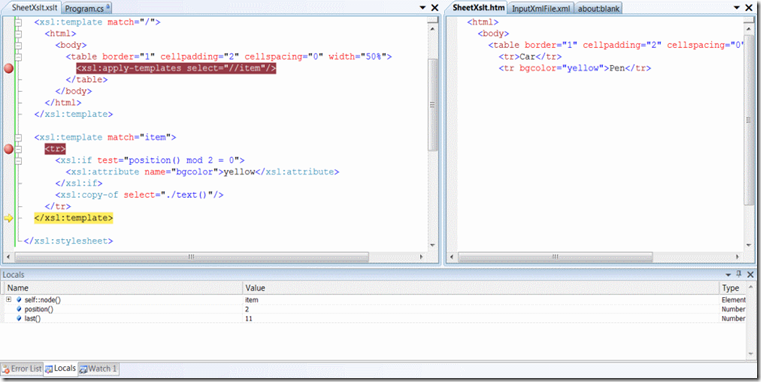
Debugging

3. Debug and actually see the magic ! In parallel you can see the output.

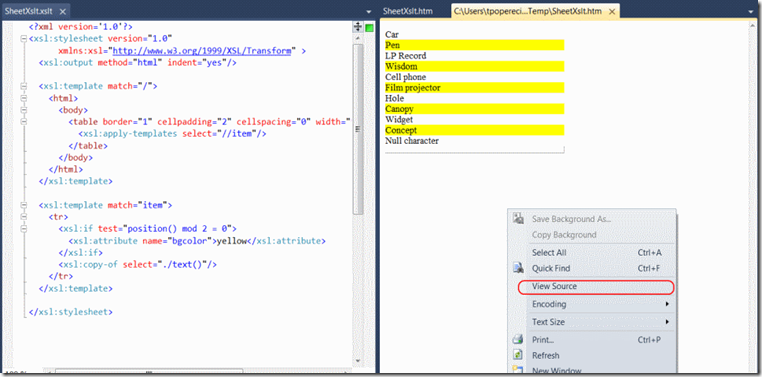
Same things could be done in VS 2010

Visual Studio 2010

And you automatically get the html output. Plus you can always see the source of html.

So get ready to a new era of XSLT debugging with all the tools you are used to: Locals, Watches, Immediate Window and others as well.

Link for Download

Tuesday, April 27, 2010

Code4Food #6: How to join multiple CSV files with the same structure ?

Hi,

Reading another question on Bytes.com I found this question. So assuming these CSV files have the same structure, I can easily join them.

Now to test it I split this CSV file into 5 files: CsvFile1.csv … CsvFile5.csv

"REVIEW_DATE","AUTHOR","ISBN","DISCOUNTED_PRICE"
"1985/01/21","Douglas Adams",0345391802,5.95
"1990/01/12","Douglas Hofstadter",0465026567,9.95
"1998/07/15","Timothy ""The Parser"" Campbell",0968411304,18.99
"1999/12/03","Richard Friedman",0060630353,5.95
"2001/09/19","Karen Armstrong",0345384563,9.95
"2002/06/23","David Jones",0198504691,9.95
"2002/06/23","Julian Jaynes",0618057072,12.50
"2003/09/30","Scott Adams",0740721909,4.95
"2004/10/04","Benjamin Radcliff",0804818088,4.95
"2004/10/04","Randel Helms",0879755725,4.50

Now I made the program which makes the deal. Nothing to special here, just want to mention you do not need joining multiple times the column headers.

using System;
using System.Collections.Generic;
using System.Linq;
using System.Windows.Forms;
using System.IO;
using System.Text;

namespace CsvJoiner
{
    static class Program
    {
        public static void Main()
        {
            string[] csvFileNames = Directory.GetFiles(".", "CsvFile*.csv");

            JoinCsvFiles(csvFileNames, "CsvOutput.csv");
        }

        private static void JoinCsvFiles(string[] csvFileNames, string outputDestinationPath)
        {
            StringBuilder sb = new StringBuilder();

            bool columnHeadersRead = false;

            foreach (string csvFileName in csvFileNames)
            {
                TextReader tr = new StreamReader(csvFileName);

                string columnHeaders = tr.ReadLine();

                // Skip appending column headers if already appended
                if (!columnHeadersRead)
                {
                    sb.AppendLine(columnHeaders);
                    columnHeadersRead = true;
                }

                sb.AppendLine(tr.ReadToEnd());  
            }

            File.WriteAllText(outputDestinationPath, sb.ToString());
        }
    }
}
Now I'll show the output. To check out this project
download the sources here
"REVIEW_DATE","AUTHOR","ISBN","DISCOUNTED_PRICE"
"1985/01/21","Douglas Adams",0345391802,5.95
"1990/01/12","Douglas Hofstadter",0465026567,9.95
"1998/07/15","Timothy ""The Parser"" Campbell",0968411304,18.99
"1999/12/03","Richard Friedman",0060630353,5.95
"2001/09/19","Karen Armstrong",0345384563,9.95
"2002/06/23","David Jones",0198504691,9.95
"2002/06/23","Julian Jaynes",0618057072,12.50
"2003/09/30","Scott Adams",0740721909,4.95
"2004/10/04","Benjamin Radcliff",0804818088,4.95
"2004/10/04","Randel Helms",0879755725,4.50

Monday, April 26, 2010

Code4Food #5: How to get specific XML nodes using Linq to XML ?

Hi, another question has been received from Bytes.com.

So the problem was that we needed to get all the tags “Error” from a specific XML without actually caring to much about where exactly in the XML tree is Error tag. And we need to do this using Linq to Xml.

So he got an xml like these:

<Users>
      <User>
           <FirstName>Tom</FirstName>
           <LastName>Won</LastName>
           <Error>Test 2</Error>
       </User>
      <User>
           <FirstName>Jim</FirstName>
           <LastName>Kim</LastName>
           <Error>Test 2</Error>
       </User>
       <Error>Test 3</Error>
</Users>

Now this problem isn't actually a problem at all. All you need is to use Linq to XML objects like XElement, XDocument, XNode, and so on (opposite thing to XmlElement, XmlDocument, and XmlNode). Actually you can do it without directly using Linq, by callings Descendants(XName name) method.

So this is the code that I’ve written to make this done.

using System;
using System.Collections.Generic;
using System.Linq;
using System.Windows.Forms;
using System.Xml.Linq;

namespace GetErrorTags.Linq2Xml
{
    static class Program
    {
        static void Main()
        {
            // Load the document into root XElement.
            // Remember in Linq you work with XDocument, XElement, XNode and not with XmlDocument, etc.
            XElement rootElement = XElement.Load("ErrorTags.xml");

            // without directly using Linq
            var errorTags = rootElement.Descendants("Error");

            Console.WriteLine("==============Without using Linq=========");

            foreach (XElement tagError in errorTags)
            {
                Console.WriteLine(tagError);
            }

            Console.ReadKey();

            // using Ling directly, we'll select only "Test 2" errors
            var linqErrorTags = rootElement.Descendants("Error").Where(element => element.Value.Equals("Test 2"));

            Console.WriteLine("==============Using Linq=========");

            foreach (XElement tagError in linqErrorTags)
            {
                Console.WriteLine(tagError);
            }

            Console.ReadKey();

        }
    }
}

And here is the output:

Download source

Thursday, April 22, 2010

Code4Food #4: How to change WinForms Treeview control image size?

Hi,

Today I visited Bytes.com and saw a question about Treeview.

Indeed how would one change ImageSize of a node ? So I had 15 free minutes and this is what I found.

using System;
using System.Collections.Generic;
using System.ComponentModel;
using System.Data;
using System.Drawing;
using System.Linq;
using System.Text;
using System.Windows.Forms;

namespace TreeView.ImageSize
{
    public partial class Form1 : Form
    {
        public Form1()
        {
            InitializeComponent();
            FillTreeView();
        }

        private void FillTreeView()
        {
            // Load the images in an ImageList.
            ImageList myImageList = new ImageList();
            myImageList.Images.Add(Image.FromFile("63vts4.jpg"));
            myImageList.Images.Add(Image.FromFile("ToDeleteIfNotSold.png"));
            
            // Change the size of the images.
            myImageList.ImageSize = new Size(50, 50);

            // Assign the ImageList to the TreeView.
            trvImages.ImageList = myImageList;
            trvImages.ItemHeight = 50;

            // Set the TreeView control's default image and selected image indexes.
            trvImages.ImageIndex = 0;
            trvImages.SelectedImageIndex = 1;

            // Create the root tree node.
            TreeNode rootNode = new TreeNode("CustomerList");

            TreeNode childNode1 = new TreeNode("Customer1");
            TreeNode childNode2 = new TreeNode("Customer2");

            // Add a main root tree node.
            trvImages.Nodes.Add(rootNode);
            trvImages.Nodes[0].Nodes.Add(childNode1);
            trvImages.Nodes[0].Nodes.Add(childNode2);
        }
    }
}

So the magic line was myImageList.ImageSize = new Size(50, 50); Here is the output and the code to download.

Download source code link

Thursday, April 1, 2010

.NET 4.0 : System.Tuple

So, let’s go back to our subject, .NET 4.0 new stuff & features.

One of the newest things that we will have in .NET 4.0 is a tuple, what’s right and it’s not a joke!

A tuple is data structure which can contain different types of data coupled. This is what makes it different from a List or other generic types.

Note: Do not confuse it with Microsoft.Dynamics.Framework.Reports.Tuple. It is another type.

So a tuple which will contain to 7 elements is created with a factory. System.Tuple.Create. A tuple with 8 elements will contain 7 elements and another tuple Rest.

Why would we need this  type? Well, this allows us to return two or more values of different types.

Here is the code which i made to play a little bit with this type.

using System;
using System.Collections.Generic;
using System.Linq;
using System.Text;


namespace Intro.Tuple
{
    class Program
    {
        static void Main(string[] args)
        {
            var squaresList = System.Tuple.Create(1, 4, 9, 16, 25, 36, 49, 64);

            Console.WriteLine("1st item: {0}", squaresList.Item1);
            Console.WriteLine("4th item: {0}", squaresList.Item4);
            Console.WriteLine("8th item: {0}", squaresList.Rest);
            Console.ReadKey();

            Console.WriteLine(Environment.NewLine);
            
            var tupleWithMoreThan8Elements =
                System.Tuple.Create("is", 2.3, 4.0f,
                new List { 'e', 't', 'h' }, "udevi", new Stack(4), "best", squaresList);

            // we'll sort the list of chars in descending order
            tupleWithMoreThan8Elements.Item4.Sort();
            tupleWithMoreThan8Elements.Item4.Reverse();

            Console.WriteLine("{0} {1} {2} {3}", tupleWithMoreThan8Elements.Item5,
                tupleWithMoreThan8Elements.Item1,
                string.Concat(tupleWithMoreThan8Elements.Item4),
                tupleWithMoreThan8Elements.Item7);

            Console.WriteLine("Rest: {0}", tupleWithMoreThan8Elements.Rest);
            Console.WriteLine("Rest's 2nd element: {0}", tupleWithMoreThan8Elements.Rest.Item1.Item2);
            Console.WriteLine("Rest's 5th element: {0}", tupleWithMoreThan8Elements.Rest.Item1.Item5);
            Console.ReadKey();

            Console.WriteLine(Environment.NewLine);

            var tuple = GetNameAndAge();

            Console.WriteLine(Environment.NewLine);
            Console.WriteLine("Name: {0}", tuple.Item1);
            Console.WriteLine("Age: {0}", tuple.Item2);
            Console.ReadKey();
        }

        private static Tuple GetNameAndAge()
        {
            var resultingTuple = System.Tuple.Create(string.Empty, 0);

            Console.WriteLine("Enter your name please: ");
            string name = Console.ReadLine();
            Console.WriteLine("Enter your age please: ");
            string ageValue = Console.ReadLine();

            int age = -1;

            if (int.TryParse(ageValue, out age))
            {
                resultingTuple = new Tuple(name, age);
            }

            return resultingTuple;
        }
    }
}

And here is what in our case the Rest is:

And the output:

Hope it helps you! See you around!

Wednesday, March 31, 2010

Tools I can’t imagine my dev life without #1: Ninite.com

Hi,

Last day of March and I want to start today this new series of posts where I’ll try to share with you some of the gems already there, but I suppose the majority of developers in the world don’t really know about.

So one of these gems is site Ninite.com.

Every time when I need to install a fresh version of Windows somewhere (and as a programmer I do this more than I would like to) and there is an internet connection I use Ninite installer to install all the software that is needed. It does have almost everything there, and the list is growing.

Once you’ve chosen the programs you’d like to install, it will generate an installer for you, and you should save it on your machine and download it. Now after you’ve downloaded it, run it and you will see something like these (it depends on the programs you’ve chosen).

After that, you’ll just need to wait while all of your programs will finish to install, and that’s all!

Awesome!!! Isn’t it?

Ideas, concerns, suggestions, tips & tricks – I’m waiting for all these. Take care.

Friday, March 26, 2010

jQuery - SlideShare

I love and use JQuery, it should be used in each and every single web application. Don't use raw javascript use JQuery instead.

Here is the presentation of Rey Bango jQuery Team Member. It should gave you a little overview on what is JQuery and how to use it.

Have questions, ideas? Post a comment and I will try to answer you.

Friday, March 19, 2010

.NET 4.0 : String.IsNullOrWhiteSpace Method

Hello one more time guys,

So I think the most of you are familiar with string.IsNullOrEmpty method which is very useful when you’re checking your string on actually having the data for different reasons:

  • Sometimes we need to parse the string
  • Add something to the string
  • Use some of the string members
  • AND try to see if the data from the database/xml/file is valid.

But now another problem is around: often the data in database has some whitespaces because there are constraints on some varchar columns NOT NULL. To works these around when something is not available, someone could insert a whitespace, and this would solve the problem, for the moment.

Actually it’s not a lot of fun to do something like

if (!string.IsNullOrEmpty(" ") && " ".Trim() != string.Empty) 

{
            

}

What’s why .NET framework 4.0 has the string.IsNullOrWhiteSpace method.

To compare there 2 methods I did the following program:

using System;
using System.Collections.Generic;

namespace Intro.StringIsNullOrWhiteSpace
{
    class Program
    {
        /// 
        /// The main entry point for the application.
        /// 
        static void Main(string[] args)
        {
            // let's say we have a Dictionary of int - string
            // the string representation of a number. Example: 1 - one
            Dictionary integerDictionary = new Dictionary();
            integerDictionary.Add(1, "one");
            integerDictionary.Add(2, "two");
            integerDictionary.Add(300, "three hundreds");
            integerDictionary.Add(4, "four");
            integerDictionary.Add(67, "sixty seven");

            // let's assume that we don't know anything about the data in the dictionary
            // we also could have something like
            integerDictionary.Add(5000, null);
            integerDictionary.Add(50001, string.Empty);
            integerDictionary.Add(56565, " ");
            integerDictionary.Add(23, " \r\n ");

            // now let's check it with string.IsNullOrEmpty
            Console.WriteLine("string.IsNullOrEmpty");
            Console.WriteLine("===================================");
            foreach (var keyValuePair in integerDictionary)
            {
                if (string.IsNullOrEmpty(keyValuePair.Value))
                {
                    Console.WriteLine(keyValuePair.Value + " - True");
                }
                else
                {
                    Console.WriteLine(keyValuePair.Value + " - False");
                }
            }
            Console.ReadKey();
            Console.WriteLine(Environment.NewLine);

            // let's check it now with the new one : string.IsNullOrWhiteSpace
            Console.WriteLine("string.IsNullOrWhiteSpace");
            Console.WriteLine("===================================");
            foreach (var keyValuePair in integerDictionary)
            {
                if (string.IsNullOrWhiteSpace(keyValuePair.Value))
                {
                    Console.WriteLine(keyValuePair.Value + " - True");
                }
                else
                {
                    Console.WriteLine(keyValuePair.Value + " - False");
                }
            }
            Console.ReadKey();
        }
    }
}

Here is the output of the program:

Have a nice day and  use it in .NET 4.0 !

Friday, February 26, 2010

.NET 4.0 : Complex Numbers


    Hello today I’m going to start to describe and apply the new classes which were added into .NET 4.0 Framework.


When I was 16, it always was a problem there. Sex was in the air, a lot of different opportunities had the habit to rise without any prevention at all, and I was loving challenges. BUT, it also was the period when the most useless and useful information was taken in and out from the classes. Physics, mathematics, chemistry and others were at the same time boring and challenging.

One of the basic subjects in math was : Quadratic equations, and also introduction of complex numbers, which was pretty strange… imaginary and real parts formed the complex number. But these numbers has a lot applications in physics, astronomy and geometry.

Question how did we solved these kind of equations in the past?
We did a structure or a class and tried different things with it, like multiplication and division, and others as well. But sometimes we didn’t really figured out very well the logic.

Now, guess what, in .NET 4.0 we already got a Complex structure, which in fact represents the complex number.

So here is a very simple application of it:

using System;
using System.Numerics;

namespace Intro.ComplexNumbers
{
    class Program
    {

        static void Main(string[] args)
        {
            // do it always, we'll stop the loop by pressing Ctrl + C.
            while (true)
            {
                string errorMsg = string.Empty;

                Console.WriteLine("To solve the quadratic equations using the Quadratic Formula,");

                int a = ReadCoeficientValueFromConsole("a", "Please enter ax^2: ", ref errorMsg);

                if (!string.IsNullOrEmpty(errorMsg))
                {
                    ShowErrorMessage(errorMsg);
                    break;    
                }

                int b = ReadCoeficientValueFromConsole("b", "Please enter bx: ", ref errorMsg);

                if (!string.IsNullOrEmpty(errorMsg))
                {
                    ShowErrorMessage(errorMsg);
                    break;
                }

                int c = ReadCoeficientValueFromConsole("c", "Please enter c: ", ref errorMsg);

                if (!string.IsNullOrEmpty(errorMsg))
                {
                    ShowErrorMessage(errorMsg);
                    break;
                }

                // we're assuming that the discriminant is negative
                // for more information visit http://en.wikipedia.org/wiki/Quadratic_Formula#Quadratic_formula
                Complex root1 = new Complex(-b / 2 * a, Math.Sqrt(4 * a * c - b * b) / 2 * a);
                Complex root2 = new Complex(-b / 2 * a, (-1) * Math.Sqrt(4 * a * c - b * b) / 2 * a);

                Console.WriteLine("Roots are: ");
                Console.WriteLine("Root1 (positive): {0}", root1);
                Console.WriteLine("Root2 (negative): {0}", root2);
            }
        }

        /// 
        /// Shows error message in console.
        /// 
        /// Error message.
        private static void ShowErrorMessage(string errorMsg)
        {
            Console.WriteLine(errorMsg);
            Console.ReadKey();
        }

        /// 
        /// Reads a string from console and tries to convert it into an Int32, and assign it 
        /// to a coefficient.
        /// 
        /// Coefficient name.
        /// String which will be shown to ask the coefficient introduction.
        /// The coefficient Int32 value.
        private static int ReadCoeficientValueFromConsole(string coefficientName, string requieringString, ref string errorMsg)
        {
            int coeficient = 0;

            Console.WriteLine(requieringString);

            string aValue = Console.ReadLine();
            if (!string.IsNullOrEmpty(aValue))
            {
                try
                {
                    coeficient = Convert.ToInt32(aValue);
                }
                catch (FormatException)
                {
                    errorMsg = "Your '" + coefficientName + "' coeficient is not a numeric value.";
                }
                catch (Exception)
                {
                    errorMsg = "There was an exception raised because of coeficient '" + coefficientName + "'";
                }
            }

            return coeficient;
        }
    }
}

Here are some screenshots:

Figure 1. Coefficient error

Figure 2. Good coefficients solving 3x2 + 9x +7 = 0

Download source from here

NOTE: I’ve done this project using Visual Studio 2010 RC.

Wednesday, February 24, 2010

What’s going to blow our mind in 2010 ?

Hi guys, now a little time passed, half of the year while I'm semi-actively posting here.

We took a step back and tried to write about things which could matters. And which isn’t really discussed by anyone else.

I really tried to make it better, although I hope that this year I’m gonna obtain my goal of writing at least once per week.

So what is going to blow our mind ?


I will be writing about:

  • Udevi community
  • F# 2.0
  • Visual Studio 2010
  • ASP.NET MVC 2.0
  • .NET 4.0
  • JQuery
  • Open source projects in which I’ll be participating
  • Tips and tricks

Hope you will like it !

Sunday, February 21, 2010

Stack Overflow

Check out this SlideShare Presentation:
Webstock 2010 - Stack Overflow: Building Social Software for the Anti-Social (Jeff Atwood)